Why Are My Cannabis Leaves Turning Yellow and How to Fix It
12 min read · , updated May 14, 2026
Yellow leaves are your cannabis plant's most urgent communication — and almost every grower, from first-time hobbyists to seasoned cultivators, will see them at some point. The question isn't whether your plant will flash this signal; it's whether you'll know what it's saying when it does. Understanding weed leaves and their symptoms is the single most valuable diagnostic skill you can develop as a grower.
The three root causes account for the overwhelming majority of yellowing cases: nutrients, watering habits, and pH balance. Get those three things right, and you'll spend far less time troubleshooting and far more time watching your canopy thrive.
The Fast Diagnosis: Where the Yellow Starts Tells You Almost Everything
Location is the first clue. Before you adjust a single feed or flush your medium, look carefully at where the yellowing is appearing — bottom fan leaves, new growth at the canopy, or scattered uniformly across the entire plant. Each pattern points to a fundamentally different problem, and conflating them leads to fixes that make things worse.
Here's what each location is telling you:
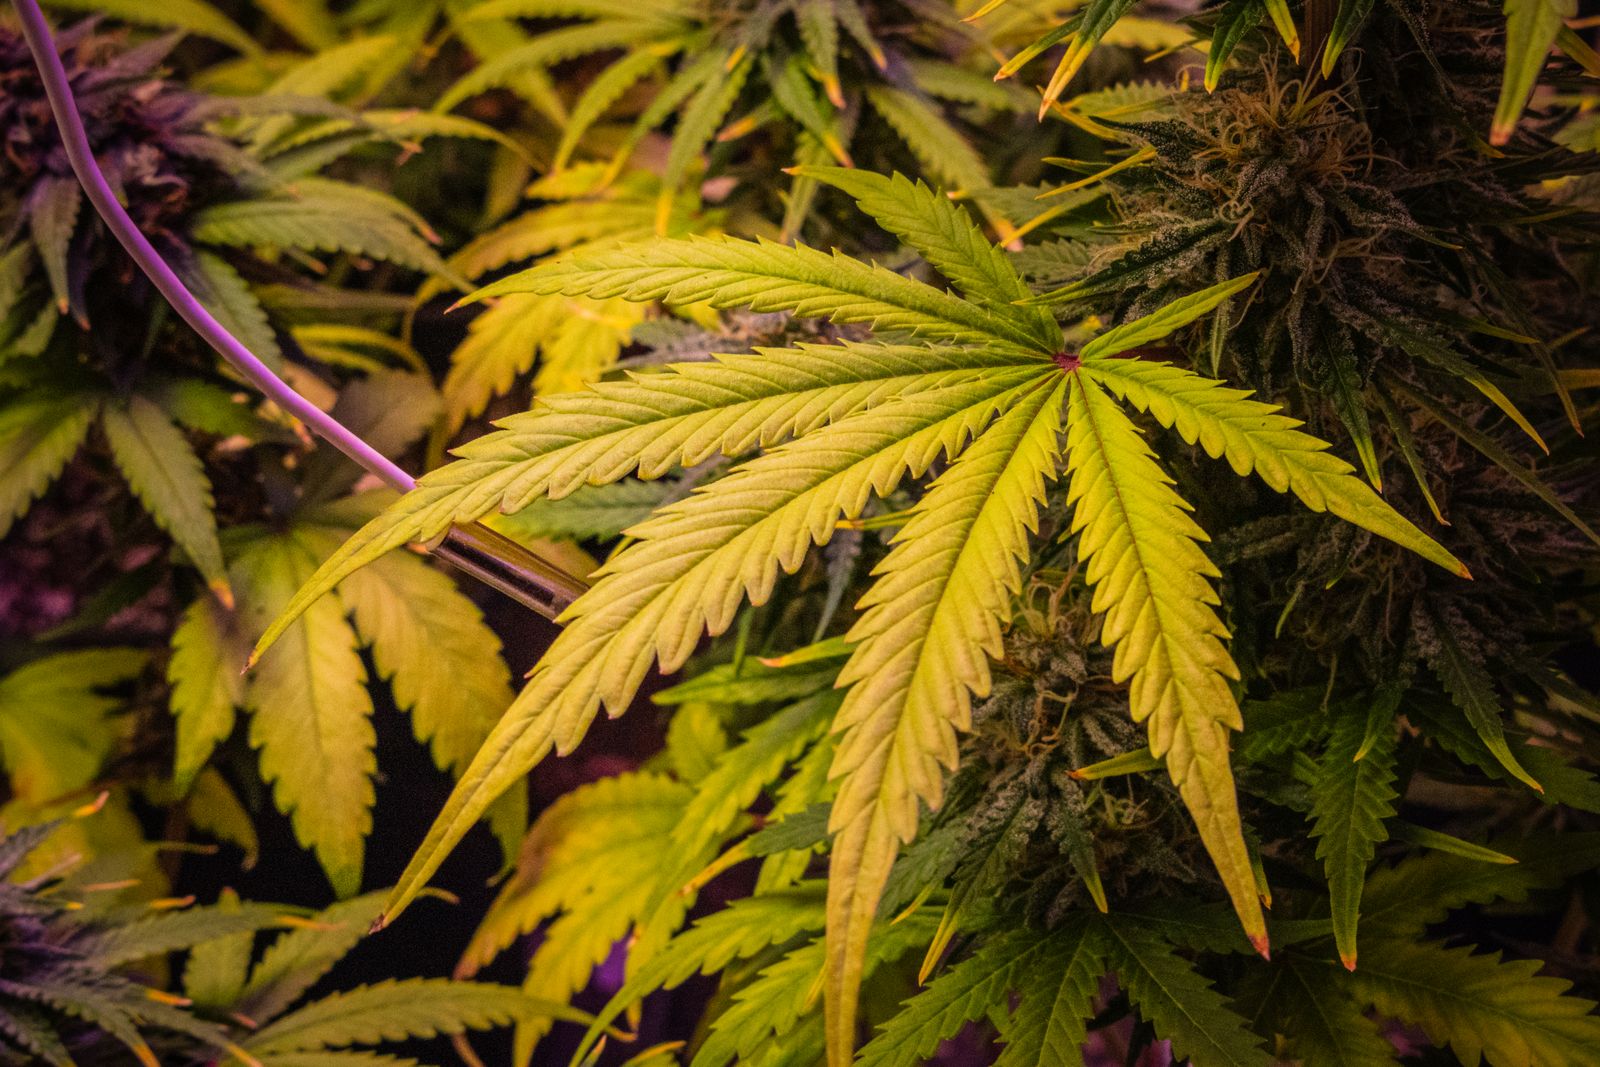
- Bottom of the plant (older leaves): The plant is mobilising nitrogen or other mobile nutrients upward to fuel new growth. Classic deficiency signal.
- Top of the plant (new growth): pH is likely off, triggering nutrient lockout — or there's a shortage of immobile nutrients like iron, sulphur, or zinc that the plant cannot relocate from old tissue.
- All over the plant simultaneously: Overwatering or underwatering. Root health is compromised and nutrient uptake has stalled.
That single visual check — old growth or new growth?, will narrow your suspect list from a dozen possibilities down to two or three. Everything else is refinement.
It's also worth noting what yellowing is not. Late in the flowering stage, lower fan leaves turning yellow is a completely normal expression of senescence — the plant deliberately pulling resources from old leaves into swelling buds. If you're eight to ten weeks into flower, the lower leaves are yellowing, and the calyxes look fat and frosty, congratulations: you're close to harvest. That yellowing is a trophy, not a warning.
Why pH Is the Hidden Villain Behind Most Yellow Leaves
Here's the counter-intuitive truth that trips up growers at every experience level: your plant can be sitting in a perfectly mixed, nutrient-rich solution and still starve. If the pH of your growing medium is outside the optimal window, nutrient lockout occurs — the roots physically cannot absorb the elements that are right there waiting for them. You can pour on more fertiliser and make the problem worse.
Think of root uptake as a series of locked doors. Each nutrient has a specific pH range at which its door swings open. Nitrogen is most available between 6.0 and 7.0 in soil. Iron needs a slightly more acidic environment. Phosphorus locks out on both ends of the spectrum. When pH drifts, some doors jam, others slam shut entirely, and the plant starves regardless of what's in the reservoir.
Getting this dialled in is a genuine big shift for plant health — it's often the single most impactful correction you can make before touching anything else in your feeding programme.
Target pH Ranges by Growing Medium
- Soil: Aim for 6.0 – 7.0, with a sweet spot around 6.2 – 6.8. Soil's buffering capacity gives you a bit of forgiveness, but don't rely on it.
- Coco coir or hydro systems: Target a tighter band of 5.8 – 6.2. Inert media have no buffering capacity, so pH swings hit hard and fast.
Test pH at two points: the water going in and the runoff coming out. If they diverge significantly, your medium has accumulated salt build-up that's skewing the root-zone environment. A flush with pH-corrected water resolves this in most cases.
If your readings are running low and you need to bring them up, our step-by-step guide on how to raise the pH of water walks you through the process with precision. A calibrated digital metre (available for under $30 CAD at most grow shops or online) is a better investment than any single nutrient product you'll ever buy.
Decoding Nutrient Deficiencies: Nitrogen, Magnesium, and Iron
With pH confirmed as solid, it's time to look at the diet itself. Cannabis is a heavy feeder, particularly during vegetative stretch and the first half of flower, and specific deficiencies produce distinct, readable symptoms once you know what to look for.
Nitrogen deficiency is the most common deficiency in cannabis cultivation, full stop. It presents as a uniform, solid yellowing that begins on the oldest, lowest fan leaves and migrates upward over days. The reason is straightforward: nitrogen is a mobile nutrient. The plant can relocate it from older tissue to actively growing shoot tips, so the oldest leaves sacrifice themselves first. Left unaddressed in veg, nitrogen deficiency will significantly reduce final yield — internode stretch suffers, bud sites don't develop properly, and the plant enters flower already behind.
The Three Most Common Deficiency Patterns
- Nitrogen (N) Deficiency: Uniform pale yellowing starting on lower, older fan leaves and progressing upward. Leaves eventually dry and drop. Most prevalent in fast-growing vegetative plants and early-flowering cultivars that haven't had nitrogen tapered yet.
- Magnesium (Mg) Deficiency: Interveinal chlorosis on older leaves — the tissue between the veins yellows while the veins themselves stay green, creating a marbled or tiger-striped appearance. Magnesium is the central atom in the chlorophyll molecule, so deficiency directly impairs photosynthesis. Common in soft-water regions of Canada and in coco coir grows without adequate cal-mag supplementation.
- Iron (Fe) Deficiency: The inverse of nitrogen — affects new growth first. Young top leaves turn bright, almost neon yellow while their veins remain distinctly green. This pattern almost always indicates a pH problem rather than a true lack of iron in the medium, since iron becomes unavailable above pH 6.5 in soil.
The mobile vs. immobile distinction is the conceptual key here. Mobile nutrients (nitrogen, phosphorus, potassium, magnesium) show deficiency on old leaves first, because the plant redistributes them. Immobile nutrients (iron, calcium, zinc, sulphur) show deficiency on new leaves first, because the plant cannot move them from existing tissue. Once you internalise that distinction, you can triage almost any yellowing scenario in under a minute.
When supplementing to correct a deficiency, start at half the recommended dose. Overfeeding a stressed plant causes nutrient burn — the leaf tips go crispy brown, and compounds the problem. Watch the new growth that emerges after your correction. If it comes in deep green and healthy, you've nailed it. The old yellow leaves won't recover, but that's fine; they've told you what you needed to know.
For a comprehensive breakdown of feed schedules and product recommendations, our full guide on nutrients for your cannabis plants covers the entire grow cycle from seedling through late flower.
Watering: The Number One Mistake New Growers Make
Overwatering doesn't look like you'd expect. The leaves don't look dry; they look swollen, heavy, and droopy — a plant that appears to be wilting despite sitting in soaking wet soil. That paradox confuses growers into watering more, which deepens the problem.
Roots need oxygen as much as they need water. Constantly saturated soil creates an anaerobic root zone: microbial activity shifts toward pathogenic organisms, root cell walls begin to break down, and nutrient uptake shuts down entirely. The resulting yellowing spreads across the whole plant because no part of it can access food or water effectively. It's one of the most common reasons cannabis leaves turn yellow, especially in the first few grows.
Underwatering produces its own version of this stress. A dehydrated root zone can't move nutrients into solution, cells lose turgor pressure, and the plant yellows under the combined strain of heat stress and starvation. Both extremes present similarly; the feel of the leaves and the weight of the pot are your best diagnostic tools.
Two Reliable Methods to Know When to Water
- The Finger Test: Push your index finger about 2.5 cm (1 inch) into the growing medium. If you feel moisture, wait another day. If it feels dry at that depth, it's time to water thoroughly until runoff appears at the base of the pot.
- The Lift Method: Immediately after a full watering, lift the pot and memorise its weight. Lift it daily. When it feels noticeably lighter — sometimes strikingly so — the medium has dried sufficiently and the plant is ready for its next drink.
Container choice matters enormously here. Fabric pots are the single best upgrade a beginner can make: they allow passive air pruning of roots, promote the wet-dry cycle naturally through evaporation from the sides, and make true overwatering almost impossible. Standard plastic pots trap moisture and provide no oxygen exchange at the root zone.
For a thorough treatment of timing, volume, and technique, our watering guide goes deep on establishing the right rhythm for your specific pot size, medium, and ambient climate — which matters a great deal across Canada's varied growing environments.
Environmental Stressors: Light Burn, Temperature, and Pests
You've confirmed your pH is dialled, your feeding is on point, and your watering schedule is solid — yet the yellowing persists. The problem may not be in the pot at all. Your grow environment itself can generate leaf stress that mimics deficiency symptoms convincingly.
Light Burn and Temperature Extremes
Light burn is a textbook case of a problem that looks serious but has a two-second fix. If your grow light is hanging too close to the canopy — particularly with high-intensity LEDs or HPS fixtures, the leaves closest to the source will turn a bleached, washed-out yellow while the rest of the plant looks completely healthy. The key identifier: it's localised to the highest point of the canopy. Raise the fixture by 5–10 cm, and the problem stops within days.
Temperature stress is sneakier. Cannabis plants perform optimally between roughly 20°C and 28°C (68°F–82°F) with lights on. Consistently exceeding 29°C (85°F) accelerates respiration, increases VPD to stressful levels, and triggers generalised leaf yellowing and tip curling. Dropping below 15°C (60°F) slows enzymatic activity, stalls nutrient uptake, and can cause purple discolouration alongside yellowing — particularly in more cold-sensitive sativa-leaning genetics. A reliable thermometer-hygrometer is a non-negotiable piece of equipment.
Pests: Small Problems With Large Consequences
Spider mites, fungus gnats, thrips, and aphids can all produce yellowing — typically as stippled yellow spots, bronzing, or general pallor caused by cell damage and sap extraction. The tell-tale sign is pattern irregularity: pest damage rarely produces the clean, uniform yellowing of a nutrient deficiency. You'll often see small spots, silvery streaking on leaf surfaces, or fine webbing on undersides.
Flip your leaves and look with a jeweller's loupe or a phone camera on macro. Early detection is the difference between a minor inconvenience and a lost crop. If fungus gnats are your issue, our guide on how to get rid of gnats in your plants covers biological controls, sticky traps, hydrogen peroxide soil drenches, and prevention strategies that work in the Canadian indoor growing context.
Your Weekly Prevention Checklist: Stay Ahead of the Problem
Prevention is always cheaper than the cure. A consistent ten-minute weekly walkthrough of your grow space will catch the vast majority of yellowing problems before they become yield-limiting events. Build these checks into your routine until they're automatic.
- Test pH in and out. Check the pH of your input water and your runoff. If they diverge by more than 0.5, investigate the root zone. Keeping the grow medium in its optimal pH window prevents lockout before it starts.
- Assess moisture by weight and feel. Don't water on a calendar — water on plant demand. Lift pots daily, use the finger test, and let the wet-dry cycle do its job. Your roots need air as much as water.
- Inspect the undersides of leaves. Flip a random selection of leaves and look for any speckling, webbing, eggs, or insects. Thirty seconds of inspection per plant can save a whole grow.
- Read the new growth. Whatever corrections you've made, new growth is your report card. Pale, stunted, or distorted new leaves mean something is still wrong. Deep green, vigorous new growth means you've solved it.
- Check canopy distance and temperature. Confirm your lights are at the manufacturer-recommended distance, check your max/min thermometer, and adjust ventilation if temperatures have crept outside range.
Catching issues at step one — a pH reading slightly outside range, costs you ten minutes and a small pH adjustment. Catching the same issue after two weeks of lockout costs you yield, quality, and potentially the grow entirely.
Frequently Asked Questions About Yellow Cannabis Leaves
Can Yellow Leaves Turn Green Again?
Rarely, and only if the deficiency is caught at the very earliest stage of chlorophyll loss. Once a leaf has gone fully yellow, the chlorophyll is gone and it won't return. Don't spend energy trying to rehabilitate individual leaves.
The correct focus is on the root cause: correct whatever drove the yellowing, and watch the new growth that follows your fix. If it comes in healthy, green, and vigorous, you've solved the problem. The old yellow leaves served their purpose as diagnostic signals; they've done their job.
Is It Normal for Leaves to Turn Yellow During Flowering?
— and it's often a positive sign. The natural process of senescence accelerates in the final weeks of flower as the plant shifts its remaining resources entirely into resin and bud production. Lower, older fan leaves will yellow and drop; this is expected and desirable. Your plant is not sick; it's finishing.
The key distinction: senescence yellowing moves from the bottom up, on the oldest leaves, while the buds continue to swell and develop normally. If you're seeing yellowing spreading to the upper canopy or affecting bud leaves before week six or seven of flower, that's a different conversation — investigate pH, nitrogen taper timing, or environmental stress.
How Can I Tell Overwatering from a Nitrogen Deficiency?
The two can look superficially similar, but the physical presentation is quite different once you know what to feel for.
Overwatering typically causes whole-plant drooping. The leaves feel heavy, almost turgid — swollen with water but without structure. The entire plant sags uniformly, and the soil will feel wet or cool even a few centimetres below the surface. The yellowing, when it appears, is generalised.
Nitrogen deficiency produces yellowing that is precise and bottom-up in its progression. The lower fan leaves go pale and may feel thin or papery, but the upper canopy often looks perfectly upright and healthy. The plant is not drooping; it's specifically relocating nitrogen from old tissue to new growth. If your top growth looks vigorous and your lower leaves are yellowing, that's a classic nitrogen signal, not a water issue.
Yellow leaves are a language, not a verdict. Master the diagnostic logic in this guide — location, pattern, texture, timing, and you'll rarely be stumped for long. Growing Marijuana successfully comes down to developing that observational instinct: the habit of looking closely, reading accurately, and acting with precision rather than panic.
At Pacific Seed Bank, we've built a catalogue of over 1,400 autoflowering and feminised cultivars selected for vigour, stability, and expression under Canadian growing conditions. Give your seeds the environment they deserve, and they'll reward you with everything their genetics have to offer. Find your next favourite strain today and put this knowledge to work from day one.
Keep Reading

How Much Does It Cost To Grow Your Own Weed in Canada?
Learn the real costs of growing weed at home, including grow tents, lights, seeds, nutrients, electricity, and how much cannabis you can harvest.

The 5 Best Blueberry Cannabis Strains To Grow Indoors
Find the best blueberry weed strains to grow indoors, including Blue Dream, Blueberry Cheesecake, and more - and buy the seeds from Pacific Seed Bank.

Why 5.8–6.5 Is The Ideal pH for Cannabis (And When to Adjust)
Learn why 5.8-6.5 is the ideal pH for cannabis plants, how to test your plant's pH, and how to adjust it higher or lower when you need to.

The Best Autoflowering Light Schedule For Bigger Yields
Stop guessing your autoflowering light schedule. Our guide breaks down the 18/6, 20/4, and 24/0 schedules to help you grow bigger, better plants.